Use a Linux machine to install Windows 10 or Windows 11 on a Raspberry Pi SD card.
In 2020, this was flat-out impossible.
In 2021, this required following a complicated tutorial.
Now, using the new WoR-flasher, it's a piece of cake.
- This tool is 100% legal. All proprietary Windows components are downloaded straight from Microsoft's update servers using uupdump. Consider reading this debate that took place on the Raspberry Pi Forums. At the conclusion of the thread, Raspberry Pi employees confirm that WoR is completely legal. The OS is unlicenced just like a regular Windows ISO, which can be activated via an activation key or by logging in with a pre-licensed Microsoft account.
- This tool should run correctly on any Debian-based Linux, ARM or x86. However, this tool has only been tested to run correctly on Raspberry Pi OS. Botspot (the developer of this tool) cannot be held responsible for data loss!
- Need help using the WoR-flasher tool? You can open an issue or ask for help in the Botspot Software discord server.
- Need help using Windows on Raspberry (The operating system)? Contact the WoR developers through email or join their Discord server.
- WoR does not currently support WiFi. The necessary drivers simply do not exist. (yet) See this page for current driver status.
- You won't be able to use WoR-Flasher to debloat the OS. Performance is about the same, debloated or not, but there will be extra apps you'll have to manually remove if you wish to remove the extra preinstalled apps.
- Raspberry Pi 4 has its RAM limited to 3GB. There is a workaround, but it's not the default. Click here for details
- Raspberry Pi 5 support is now here, and it runs fast but there are no drivers. SD card boot seems more reliable, and for internet you need a USB to Ethernet adapter.
The fastest way to get WoR-flasher running on a RPi is by using the Pi-Apps app store for Raspberry Pi:
![]()
Installing WoR-flasher from Pi-Apps has several advantages: it creates a convenient button in the Start menu, uninstalling takes one click, and updates are handled seamlessly.
git clone https://github.com/Botspot/wor-flasher
This will download the scripts to a new directory named wor-flasher.
Dependencies: No need to install packages manually. Running the script will automatically install these: yad aria2 cabextract wimtools chntpw genisoimage exfat-fuse exfat-utils wget
~/wor-flasher/install-wor-gui.sh
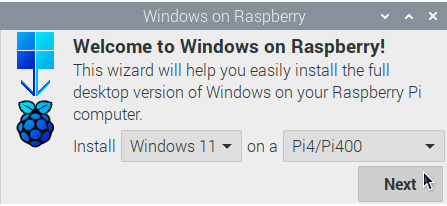
- Choose a Windows version and choose which Raspberry Pi model will be running it.
- Choose a language for Windows.

- Plug in a writable storage device to flash Windows to.

- If the storage device is larger than 25GB, it is capable of installing Windows to itself.
- If the storage device is smaller than 25GB but larger than 7GB, it can only install Windows on other drives greater than 16GB. (like a recovery/reset disk)
- If the storage device is smaller than 7GB, it is too small to be usable.
- Double-check that everything looks correct before clicking the Flash button.

- A terminal will launch and run the
install-wor.shscript:

Note: this can take a lot of time to download individual files from Microsoft, compress them, and generate a Windows image. Fortunately, subsequent runs can skip the lengthy image-generating step if the ISO file exists. - If all goes well, the terminal will close and you will be told what to do next.

~/wor-flasher/install-wor.sh
Example terminal walkthrough (click to expand)
$ ~/wor-flasher/install-wor.sh
Choose Windows version:
1) Windows 11
2) Windows 10
3) Custom...
Enter 1, 2 or 3: 1

Choose language: en-us

Choose Raspberry Pi model to deploy Windows on:
1) Raspberry Pi 4 / 400
2) Raspberry Pi 2 rev 1.2 / 3 / CM3
Enter 1 or 2: 1

Available devices:
/dev/sdb - 59.5GB - USB Storage
Choose a device to flash the Windows setup files to: /dev/sdb

1) Create an installation drive (minimum 25 GB) capable of installing Windows to itself
2) Create a recovery drive (minimum 7 GB) to install Windows on other >16 GB drives
Choose the installation mode (1 or 2): 1

Input configuration:
DL_DIR: /home/pi/wor-flasher-files
RUN_MODE: cli
RPI_MODEL: 4
DEVICE: /dev/sdb
CAN_INSTALL_ON_SAME_DRIVE: 1
UUID: 6f7de912-4143-431b-b605-924c22ab9b1f
WIN_LANG: en-us

Formatting /dev/sdb
Generating partitions
Generating filesystems
# script output continues... It generates a Windows image legally, downloads all necessary drivers, the BIOS, the bootloader, and the modified kernel. Once done it ejects the drive.
The install-wor.sh script is designed to be used within other, larger bash scripts. For automation and customization, install-wor.sh will detect and obey certain environment variables:
DL_DIR: Set this variable to change the default download location. By default, it's~/wor-flasher-files.BID: Set this variable to choose an exact Windows version ID. Example value: "22631.2861". When this variable is set,install-wor.shwill not ask the user which Windows version to use.WIN_LANG: Set this variable to choose a language for the Windows image. Example value: "en-us". When this variable is set,install-wor.shwill not ask the user which language to use.RPI_MODEL: Set this variable to choose Raspberry Pi model. Allowed values: "3", "4". When this variable is set,install-wor.shwill not ask the user which Raspberry Pi model to use.DEVICE: Set this variable to the device you want to flash. Example value: "/dev/sda". When this variable is set,install-wor.shwill not ask the user which device to use.CAN_INSTALL_ON_SAME_DRIVE: Set this variable to "1" if the device is larger than 25GB and you wish to install Windows on itself. Otherwise, set it to "0".CONFIG_TXT: Set this variable to customize the/boot/config.txtof the resulting drive. This is commonly used for overclocking or to change HDMI settings. This is the default value.RUN_MODE: Set this to "gui" if you wantinstall-wor.shto display graphical error messages.DRY_RUN: Set this variable to "1" to proceed through the setup as normal, but to exit after downloading everything. This prevents the device from being flashed.
Example usage:
DL_DIR=/media/pi/my-big-flash-drive DEVICE=/dev/sdg DRY_RUN=1 UUID=db8ec987-d136-4421-afb8-2ef109396b00 RPI_MODEL=4 WIN_LANG=en-us ~/wor-flasher/install-wor-gui.sh
The install-wor.sh script is designed to be used within other, larger bash scripts. For improved integration, install-wor.sh is equipped with a variety of useful functions that frontend scripts like install-wor-gui.sh can use.
To source the script so the functions are available:
source ~/wor-flasher/install-wor.sh source
Question: why does that command say "source" twice? Answer: The first "source" is a command, and the second "source" is a command-line flag that is passed to the script to let it know you are sourcing it.
Once the script is sourced, these new commands (also known as functions) become available:
error- a simple function that Botspot uses in bash scripts to warn the user that something failed and to exit the script with a failure code. (1)
Input: string containing the error message
Usage:
command-that-downloads-windows || error "Windows failed to download! Check your internet connection and try again."
echo_white- a simple frontend to theechocommand that displays your desired message as white text instead of the usual light-grey.
Input: string containing message
Usage:
echo_white "Now, downloading windows... please wait"
package_available- Determines if a package is possible to install from the apt repositories Input: one name of a package Usage:
if package_available yad ;then
  echo "yad can be installed"
fi
install_packages- Checks for and installs a quoted list of packages.
Input: string containing a space-separated list of packages
Usage:
install_packages 'yad aria2 cabextract wimtools chntpw genisoimage exfat-fuse exfat-utils wget'
download_from_gdrive- Downloads a publically shared large-file from Google Drive. Here's the tutorial I adapted it from.
Inputs: File ID, output filename
Usage:
download_from_gdrive 1WHyHFYjM4WPAAGH2PICGEhT4R5TlxlJC WoR-PE_Package.zip
get_partition- A clean, reliable way to determine the block-device of a partition.
Input: block device of drive, partition number
Usage:
get_partition /dev/sda 2
#Assuming partition 2 exists, the above command returns "/dev/sda2"

get_partition /dev/mmcblk0 2
#Assuming partition 2 exists, the above command returns "/dev/mmcblk0p2"

get_partition /dev/mmcblk0 all
#Returns every partition within the drive, each one on a line
get_name- Determine a human-readable name for the given storage drive.
Input: block device of drive
Usage:
get_name /dev/sda
get_size_raw- Determines the size of a drive in bytes.
Input: block device of drive
Usage:
get_size_raw /dev/sda
list_devs- list available storage drives in a human-readable, colored format.
Usage:
list_devs
get_bid- Get the latest Windows build ID for either Windows 10 or Windows 11
Input: "10" or "11" Usage:
get_bid 11
get_space_free- Get the available disk space of a folder
Input: path to folder to check Usage:
get_space_free ~/wor-flasher-files
get_os_name- Get human-readable name of operating system.
Input: valid Windows build ID
Usage:
get_os_name 22631.2861
This code will non-interactively flash Windows 11 to /dev/sda and add overclock settings. You can copy and paste the code into a terminal, or save this as a shell script.
#make all variables we set to be visible to the script (only necessary if you run this in a terminal)
set -a

#First, source the script so its functions are available
source ~/wor-flasher/install-wor.sh source

#Determine the latest Windows 11 update ID using a function
BID="$(get_bid 11)"

#set destination RPi model
RPI_MODEL=4

#choose language
WIN_LANG=en-us

#set the device to flash
DEVICE=/dev/sda

#set a custom config.txt
CONFIG_TXT="over_voltage=6
arm_freq=2147
gpu_freq=750

# don't change anything below this point #
arm_64bit=1
enable_uart=1
uart_2ndstage=1
enable_gic=1
armstub=RPI_EFI.fd
disable_commandline_tags=1
disable_overscan=1
device_tree_address=0x1f0000
device_tree_end=0x200000
dtoverlay=miniuart-bt"

#indicate that drive is large enough to install Windows to itself
CAN_INSTALL_ON_SAME_DRIVE=1

~/wor-flasher/install-wor.sh